Sketch-n-Sketch [Tutorial]
Step 1: Hello, Prodirect Manipulation World!
Welcome to the first lesson for Sketch-n-Sketch. In this lesson, you will:
- Learn the basics of the Sketch-n-Sketch programming language and interface,
- Work through a "hello, world" example, and
- Create your own simple designs.
Let's get started. As you work through the tutorial, we recommend that you keep Sketch-n-Sketch v0.6.1 open in a separate tab or window and try out all the sample interactions as you read. We'll sometimes drop in a "Practice" marker to provide a gentle reminder, and we'll use an "Exercise" marker when you really should stop, drop, and roll over to your Sketch-n-Sketch tab to try out something in-depth.
Warm-up
To preview the basics, let's jump right in. When you load the program, you start with a blank slate. Notice that there is some code on the left (the "code pane") and an SVG canvas on the right (the "canvas pane"). There are also drawing tools in the top left corner.
First, try drawing a square. Notice that the code for the square has been generated in the editor. Try moving around the square to see how the code continues to change. Try dragging the edges or the corners of the square to resize it. Try double-clicking the square to change it's colour. Now, intead of using the canvas pane to modify one of the features you just played around with, modify the code.
From these very simple interactions, we see that there are two ways to modify a program in Sketch-n-Sketch: by directly manipulating the canvas, and by editing the source program in the code pane. In the rest of this article, we will describe the basics of how to use (a) the interface, (b) the programming language, and (c) the direct manipulation capabilities.
The Interface
As you've noticed, Sketch-n-Sketch is a tool that runs completely in the web browser. We have tested the tool in Chrome and Firefox in several configurations, but we have less experience using it in IE and Edge. If you run into any issues, please let us know and try using a different browser in the meantime.
Overview of Buttons and Menus
We will briefly describe all of the components of the user interface up front for reference, but don't worry too much about all of the details — you will get plenty of practice throughout the tutorial. For now, the most important thing to remember is what you already know: that a program can be modified either programmatically (in the code pane) or using direct manipulation (in the canvas pane). You may edit in only one of these two modes at a time. The canvas pane has a faint orange border when it is active and a faint gray border when it is inactive.
Between the code and canvas panes is a column of buttons, as well as a dropdown menu that is used to load different examples and working documents into your active editing environment.
The Save and Save As buttons work similarly to how they work in desktop applications, and allow you to save your work to be resumed during a different session. The Reload button reloads your active document to the last save that was made. The Undo and Redo buttons allow you to rewind your history of edits, including those changes made both via programmatic and direct manipulation.
Below the canvas is an [Out] button that allows you to toggle between viewing
the output of your program as a visual canvas (the default) or as a "raw" SVG
definition. The latter allows you to copy-and-paste the raw SVG and export your
design to, for example, a local .svg file on your machine or into a
conventional SVG editor, such as svg-edit.
Saving Files Locally
There are two kinds of examples listed in the dropdown menu: "Built-In" examples that are are provided with Sketch-n-Sketch, and "Local Saves" which are user-created files that persist across browser sessions. Sketch-n-Sketch does not currently provide support for working directly with the file system, so you will not be able to view your work outside of Sketch-n-Sketch. When you first launch Sketch-n-Sketch, there are no local saves to display in the dropdown menu. Once you create your own local saves, they will appear in a labeled section at the top of the dropdown list.
Loading and saving examples should be pretty straightforward. The Save As button creates a copy of the current example, the Save button saves changes to the current (locally saved) example, and Reload discards any outstanding changes since the last saved version, without issuing a confirmation prompt. (Practice 1.1: Now is a good time to try creating your first local example.)
To load a different example, simply click on the dropdown menu and select one. When doing this, any outstanding, unsaved changes to the current example are discarded (again, without warning in the current implementation). If you select a built-in example, the program will be displayed in the code pane and its output will be rendered to the canvas pane. If you select a local save, the program will be displayed but not its output. After all, you may have saved a document that was not complete and would not compile! So, just hit the Run Code button when you are ready.
Okay, there's one more thing... we promise this time! If you would like to delete all your locally saved examples, select *Clear Local Saves* from the bottom of the dropdown menu. Be careful, there's no prompt to let you change your mind, and when they're gone, they're gone for good!
Customizing the UI
The interface also allows for a degree of customization by dragging around the menus and the red circles associated to the canvas and code editor. Go ahead and fiddle around with these options now.
Programming in Little
Programs in Sketch-n-Sketch are written in an untyped, little, programming language we call Little. We have chosen to use a minimalist syntax in Little that should feel familiar to anyone who has used a lisp-like language. If not, don't worry! The simple syntax will be introduced through a series of examples. If you would like to see a more complete, technical summary of Little, check out this syntax reference.
The general structure of most Little programs is the definition and calculation of everything you need for your graphic design, followed by a final "main" expression that puts together an entire SVG image. The simplest such Little program is the following:
(svg [])This program calls the svg function to draw a canvas with the given (empty)
list of shapes. Practice 1.2: Go ahead and enter Edit Mode while on the
*Scratch* example, delete the contents, and type in the code above. Then, run
the code. Congratulations, you've just written your first Little program!
Most kinds of expressions in Little, such as the function call in the program
above, must be surrounded by parentheses. The parentheses must be included, and
extra ones are not permitted. For example, both ((svg [])) and (svg ([]))
are invalid Little expressions. Try these out to see how Sketch-n-Sketch
becomes very angry when you try to run invalid programs.
Summary
Whew! You now should have a sense for how to specify your own shapes, names, and functions in Little.
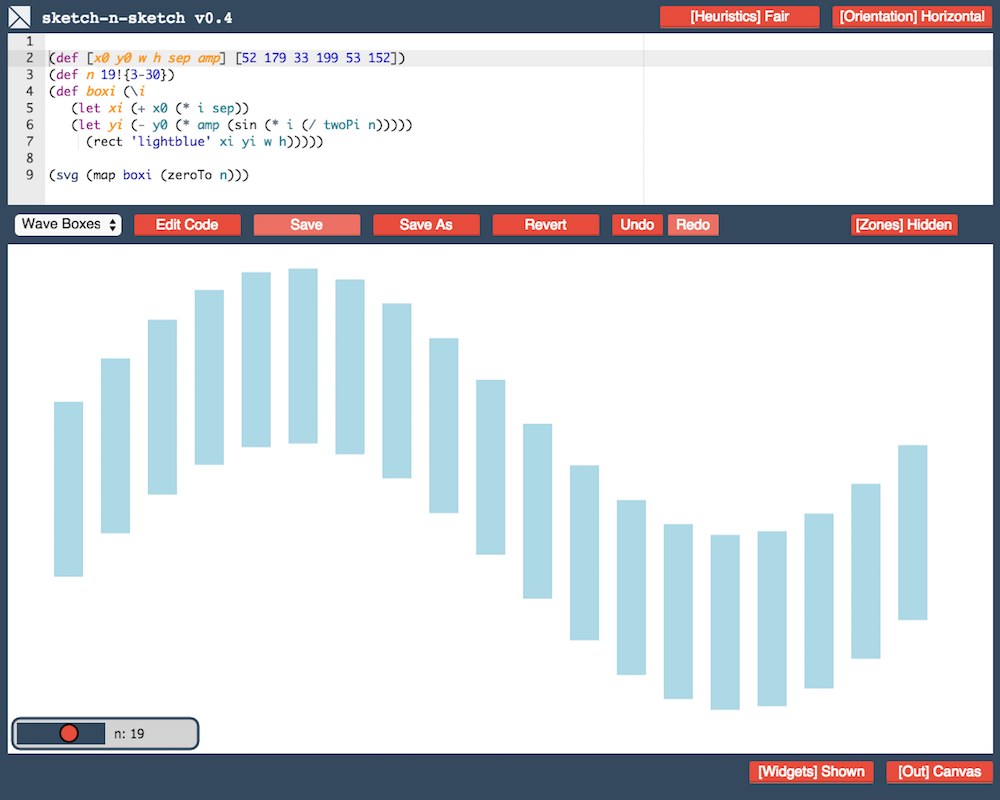
- Change your placement function to take in the y-value of the shape instead of the x-value. This should result in your shapes being placed in a vertical line instead of a horizontal one.
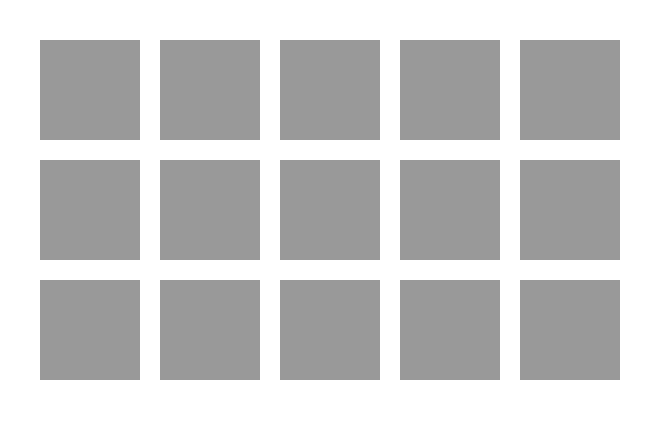
- Change your program to display more than one row of shapes using any means you see fit.
- Change your placement function to take an x- and a y-position and use these to
make a grid of shapes. Hint: The function can be mapped over a list of points,
such as
[[100 100] [200 100] ... ]. If you take this approach, then your mapping function should be defined with the form(\[x y] ...)— notice the square brackets instead of the parentheses we have seen before — which "extracts" the two values from each point in the list.
Next Up: Step 2
Technically speaking, the output is of an internal type called `Val` that is then rendered to SVG, but it can be thought of as SVG, as it mimics the structure of SVG and mostly just carries additional metadata.-->↩
To get a sense for why the `def` syntax was introduced, see the end of this old version of Prelude, where there are a lot of functions in play.↩
Just like in functional programming languages like Elm and Haskell, and similarly to the `map` method in JavaScript.↩